Setup Firebase flavors in Flutter using Very Good CLI & Flutterfire CLI
Introduction
Flutter developers often need to manage multiple environments for their apps, such as development, staging, and production. Firebase, a popular backend platform, also requires different configurations for each environment. This post will guide you through the process of setting up Firebase flavors in your Flutter project using two powerful tools: Very Good CLI and Flutterfire CLI. By leveraging these CLIs, you'll streamline your workflow and easily manage multiple Firebase environments within a single codebase.
Get started with Very Good CLI
Very Good CLI is a command-line interface tool designed to enhance Flutter development workflows. Created by the Very Good Ventures team, it aims to streamline the process of creating and managing Flutter projects with best practices baked in.
The installation guide is well documented here: Flutter Starter App (Core) 🍎 | Very Good CLI (vgv.dev)
By creating a new Flutter project using Very Good CLI, you will have a project with three environments: development, staging, production.
Create Firebase projects
Create 3 Firebase projects for different environment:

You'll have 3 projects with format like {NAME}-{ENV}:
- myproject-dev
- myproject-stg
- myproject-prod
Flutterfire CLI
FlutterFire CLI is a command-line interface tool designed to simplify the process of integrating Firebase with Flutter applications.
Install Firebase CLI
Install Firebase CLI by following instructions here
Login to your Firebase account using the command
1firebase login
Install & Configure Flutterfire
Activate Flutterfire CLI using the command
1dart pub global activate flutterfire_cli
Step 1: Configure using Flutterfire
Run flutterfire config to configure necessary files for different platforms, in this case we will start from the "dev" environment:
1 2 3 4 5flutterfire config \ --project=myproject-dev \ --out=lib/firebase_options_dev.dart \ --ios-bundle-id=com.myproject.dev \ --android-package-name=com.myproject.dev
The command above will download necessary files and include necessary dependencies in Android and iOS folder.
Run the command above in your Flutter project root for with 3 different environments:
myproject-dev, myproject-stg, myproject-prod
Make sure to edit the command above by editing the "dev" to "stg" and "prod" accordingly.
Step 2: For Android
After running the flutterfire config command for a specific firebase project, a “google-services.json” file is generated in the “app” folder of your android module.
Move the file into the "development" folder generated by Very Good CLI:

Later when we repeat this step for different environment, we will move each downloaded "google-services.json" to their respective environment folder:
dev -> android/app/src/development
stg -> android/app/src/staging
prod -> android/app
Step 3: For iOS
- Create a folder named "Firebase" in the iOS "Runner" folder.
- Create 3 folders in the "Firebase" folder, named: dev, stg, prod
- Move the downloaded “GoogleService-Info.plist” file from “Runner” into the respective development environment folder we just created whenever we run the flutterfire config for each environment.
We need to ensure the “GoogleService-Info.plist” will be copied to the root of "Runner" folder when we build the app.
- Use Xcode and open the iOS module from your Flutter project.
- Right-click on the Flutter folder on the left panel -> New File -> Choose Configuration Settings File -> Next
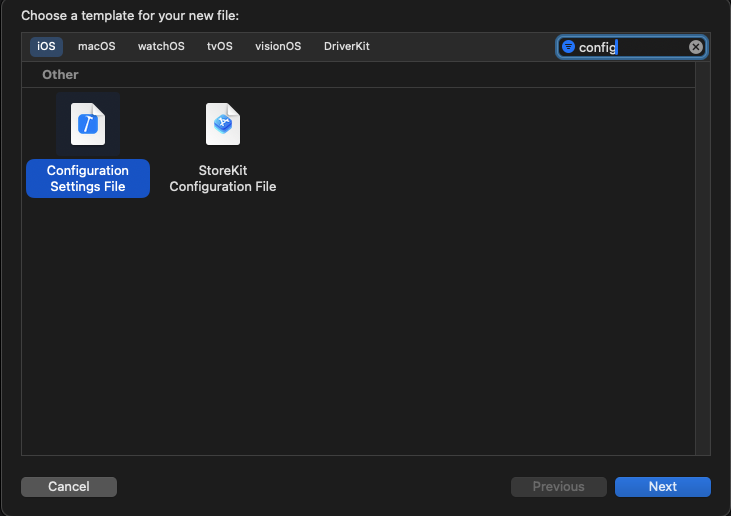
- Save as Development, Staging, Production
- Now you will have to open each of the files by double-clicking them in Xcode and paste the below
Development.xcconfig:
1 2 3#include? "Pods/Target Support Files/Pods-Runner/Pods-Runner.debug.xcconfig" #include "Generated.xcconfig" GOOGLESERVICE_INFO_PLIST = ${PROJECT_DIR}/Runner/Firebase/dev/GoogleService-Info.plist
Staging.xcconfig:
1 2 3#include? "Pods/Target Support Files/Pods-Runner/Pods-Runner.release.xcconfig" #include "Generated.xcconfig" GOOGLESERVICE_INFO_PLIST = ${PROJECT_DIR}/Runner/Firebase/stg/GoogleService-Info.plist
Production.xcconfig
1 2 3#include? "Pods/Target Support Files/Pods-Runner/Pods-Runner.release.xcconfig" #include "Generated.xcconfig" GOOGLESERVICE_INFO_PLIST = ${PROJECT_DIR}/Runner/Firebase/prod/GoogleService-Info.plist
At this time I'm using Xcode 15, which I'm not sure is there a difference in this process, but I needed to do the following to make it work:
- Select Development on the left panel
- Go to the right panel, under "Identity and Type" -> Change "Location" to "Relative to Project"
- Click on the folder icon just right below it -> Select the file location of "Development.xcconfig"

Repeat the above for Staging and Production.
Now go to Info.plist file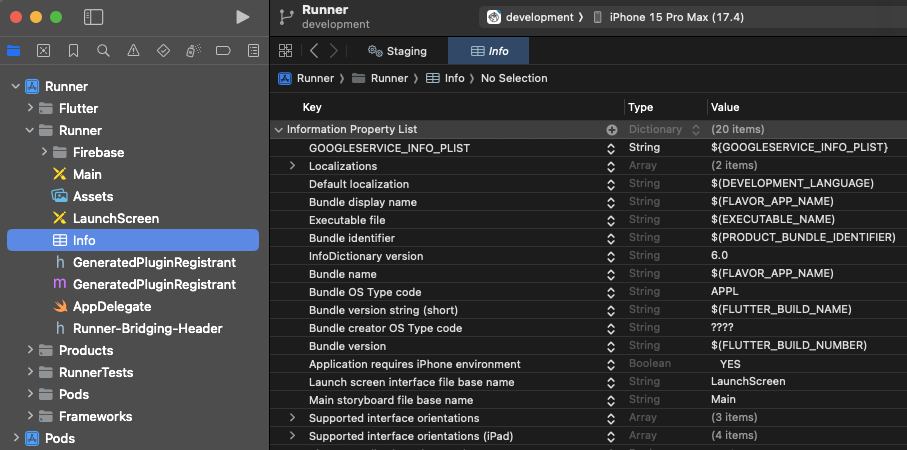
Add a Key by clicking the "+" icon, use GOOGLESERVICE_INFO_PLIST as the Key and ${GOOGLESERVICE_INFO_PLIST} as the Value.
Now go to Runner -> PROJECT -> Runner -> Info, under Configurations, replace where it says Debug, Profile and Release with the respective Development Environments as shown in the image below.

Finally we are going to create a script that copies the "GoogleService-Info.plist" to the root of Runner whenever we build the app.
Go to Runner under TARGETS -> Build Phases -> Click on the "+" icon -> New Run Script Phase.
It will create a new Run Script at the bottom most of the list, rename it to Setup Firebase Environment and drag it to be in between Run Script and Compile Sources.
Add this script to Setup Firebase Environment:
1 2 3 4 5 6#Get a reference to the destination location for the GoogleService-Info.plist PLIST_DESTINATION="${PROJECT_DIR}/Runner/GoogleService-Info.plist" #Copy plist echo "Using ${GOOGLESERVICE_INFO_PLIST} ${PLIST_DESTINATION}" cp -r "${GOOGLESERVICE_INFO_PLIST}" "${PLIST_DESTINATION}"
Then it will look like this:

Step 5:
Now for the last step in Flutter, make sure you initialize Firebase in the main Dart files: main_development.dart, main_staging.dart, main_production.dart
Note that you import the correct firebase_options file according to their environments.
Example: main_development.dart
1 2 3 4 5 6 7 8 9 10 11 12 13 14import 'package:firebase_core/firebase_core.dart'; import 'package:flutter/widgets.dart'; import 'bootstrap.dart'; import 'firebase/firebase_options_dev.dart'; import 'src/modules/app/presentation/view/app.dart'; void main() async { WidgetsFlutterBinding.ensureInitialized(); await Firebase.initializeApp( options: DefaultFirebaseOptions.currentPlatform, ); bootstrap(() => const App()); }
Conclusion
That's all for this tutorial, I hope there will be a less cumbersome steps in doing these in the future but in the meantime this is my way to do it.
Thanks for reading and if this tutorial helped you, consider supporting me by donating here: Ko-Fi